-
 Netflix Now Supports Streaming HDR10+ Content on AV1-Enabled TVs, Streaming Devices25 March 2025
 -
Starfield Is Getting Nvidia DLSS Support, FOV Slider, and More in Future Updates14 September 2023
-
Xiaomi X Series (2023) 65-inch Ultra-HD Smart TV (L65M8-A2IN) Review: Big Size, Not So Big Price25 August 2023
-
Sony Bravia XR X90L Television Series With Dolby Vision, Google TV Launched in India: Price, Specifications26 June 2023
-
Chromecast with Google TV 4K Now Receiving Android TV 12 Firmware Update17 October 2022
- Home
- Cameras
- Cameras Features
- Photography 101: HDR imaging explained
Photography 101: HDR imaging explained
By Swapnil Mathur | Updated: 5 June 2012 16:56 IST

Click Here to Add Gadgets360 As A Trusted Source

Advertisement
No matter how many people look at a photograph shot using the 'High Dynamic Range' (HDR) technique, there will always be a handful who will challenge its authenticity as a photograph, and claim it to be either a painting or an elaborately photoshopped image. The struggle of convincing people that HDR qualifies as photography has been a long and arduous one, with both sides being supported by prominent figures in the field. The primary bone of contention arises from a lack of understanding of what the HDR technique is, and towards that end, here is a point-by-point break down of the process and its history.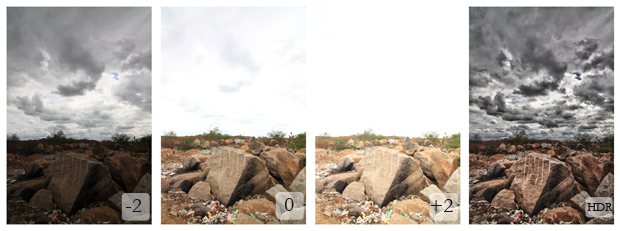

First off, we must clearly understand what the HDR technique entails. When we take a single photograph of a scene, our camera captures a certain amount of color information, a certain amount of brightness information and a certain amount of contrast information. By virtue of the laws of physics, the digital sensor is only capable of capturing a limited amount of information, an amount that is far less than what the human eye can comprehend.
The range of information luminance (combination of color, contrast and brightness) that the camera sensor captures for ONE exposure is called the dynamic range of the sensor. For most modern DSLRs, this number varies between 7 and 11 stops of exposure whereas the eye can easily recognize up to 15 stops of information. However, when speaking of HDR images, we are most concerned with not the luminance information, but in capturing the widest possible gamut of contrast range. While modern day digital sensors have a contrast ratio of up to 2048:1, the human eye's contrast detection ranges from 1024:1 to 16384:1. This large contrast range is what enables us to see the tree leaves as green despite the sun shining from right behind them in a blue sky. Shoot the same scene with a camera and the green of the color will turn black and the sky would go absolutely white.
So the above scene of looking up at a leaf with the blue sky and the sun in the background can be broken down into three areas, photographically. The sun would be called the 'highlight' area, where there is maximum illumination, the leaf would be called the 'shadows' area because the viewing surface of the leaf is directly in front of the source of light (causing it to be covered in a shadow) and the sky would be considered the 'midtones' area as its illumination is less than the highlight area, but more than the leaf. What HDR photography entails is taking three photographs, without moving the camera, of the three areas we just spoke of so as to get them as best exposed as possible.
Most modern day DSLRs now allow users to set exposure bracketing, an automated method where the camera takes a set number of photos at exposure levels a set increment away from the base exposure. Of the DSLRs that offer this feature, most allow only three exposures within an exposure difference of 2 stops, meaning, if the base exposure is set at zero, then the 2nd exposure will be under-exposed by 2 stops and the third exposure will be over-exposed by 2 stops. There are three things to always keep in mind when attempting at HDR photography.
1) The same exposure difference will not work for all kinds of scenes, meaning, what settings may work for one scene, might not work for another.
2) Not all scenes can be shot as HDR. These would generally include scenes where the mid-day sun is high in the air and your subject stands right in front of it.
3) Shooting the primary exposures is only the first step of a two-step process.
Once the exposures have been shot, they need to be processed in software developed to create HDR images out of multiple exposures. Again, this is not as simple as taking different parts of an image and pasting it onto a single image. The process involves reading color, brightness and contrast information in the photos and merging that information into a single jpg file with all the information blending in smoothly, as if it were all part of a singular image to begin with.
The process for doing this is called 'Tone Mapping', where the overall contrast ratio is reduced to that of a normal photograph, but the local contrast of each pixel is maintained with respect to its neighboring pixel. Tone mapping offers a plethora of settings that control almost every aspect of the merged image, from amount of contrast to amount of saturation to the amount of 'blend' of the three (or more) images. This is where, as an artist, you would decide whether to keep the HDR blend look realistic, turn it into a surreal blast of colors and contrast.
While the best HDR images are created through an arduous process, toiling in the field and then on the computer, there are certain cameras that allow in-camera HDR, with some newer cellphones also sporting the feature, for example, the iPhone 4(s). The native HDR mode on such devices would shoot two exposures (one for shadows and one for highlights) before blending them, and then simply present the blended result. The user often would not have any control over how the images get blended together. There are a few apps for the iPhone that does allow some level of control over the settings, but the number of shots being limited to two effectively leaves out much of the contrast information that is normally contained in the midtones shot.
HDR photography existed in the era of film, where photographers would splice together negatives of different exposures to create one perfectly blended positive image, and now, the same technique is being carried out through the digital workflow. The process of HDR requires just as much creativity as it does technical skill, so the only way to master it, as one would photography, is through a lot of practice. So get out there with your cameras and tripods and start shooting!
Comments
Get your daily dose of tech news, reviews, and insights, in under 80 characters on Gadgets 360 Turbo. Connect with fellow tech lovers on our Forum. Follow us on X, Facebook, WhatsApp, Threads and Google News for instant updates. Catch all the action on our YouTube channel.
Related Stories


 65-inch Ultra-HD Smart TV (L65M8-A2IN) Review: Big Size, Not So Big Price")


Advertisement
Follow Us
-

07:26
Mahindra Thar Roxx Star Edition Review -
19:55
AI Is Drinking Our Water, Apple Changes the iPhone Forever & Thar Roxx Review | Tech360 -
02:55
Apple Finally Allows iPhone Sideloading. Is It Safe? -
02:27
[Sponsored] One Power Outage. One Phone. One Very Long Day -
00:51
[Sponsored] Virtual Reflector Portrait Tips | Galaxy S26 Ultra
Advertisement
Popular on Gadgets
- Samsung Galaxy S26 Ultra
- Motorola Razr Fold
- ChatGPT
- OPPO Find N6
- Mobiles Under Rs. 40,000
- Vivo X300 Ultra
- Asus Zenbook S14
- iQOO 15
- Vivo X300 Pro
- Lenovo Yoga Slim 7i Aura Edition
- iQOO 15R
- Vivo X Fold 5
- Sony PlayStation 5
- HP OmniPad 12
- OnePlus Nord CE 6 Lite
- OnePlus Pad 4
- OPPO F33 Pro 5G
- Cryptocurrency
- HP OmniBook Ultra 14 (2026)
- iPhone 17
- Eureka Forbes AP 355 Room Air Purifier
- Latest Mobile Phones
- Compare Phones
Latest Gadgets
- OnePlus N6
- Samsung Galaxy M47 5G
- Vivo X Fold 6
- Vivo Y6a
- OPPO Reno 16F 5G
- Lava Smart 4 Plus
- Samsung Galaxy A27 5G
- Infinix Note 60 Pro Pininfarina Edition
- Microsoft Surface, 13.8-inch
- Microsoft Surface, 15-inch
- Moto Pad 70 Pro
- OnePlus Pad 3 Pro
- Amazfit Cheetah 2 Ultra
- Amazfit Bip Max
- Sony Bravia 9 II
- Haier HQLED P7 Pro
- Acer Predator Atlas 8
- Asus ROG Ally
- IFB 1.5 Ton 3 Star Inverter Split AC (CI193GN22RGM3)
- IFB 2 Ton 3 Star Inverter Split AC (CI223GD32RGM3)

- About Us
- Sitemaps
- Feedback
- Archives
- Contact Us
- RSS
- Advertise
- Career
- Privacy Policy
- Ethics
- Editorial Policy
- Terms & Conditions
- Complaint Redressal
Download Our Apps
Available in Hindi
© Copyright Red Pixels Ventures Limited 2026. All rights reserved.


